There are many factors to consider when taking pictures with a drone. Understanding the camera settings like ISO, shutter speed and aperture is essential to ensure the best possible picture. You can also use ND filters to take pictures with your drone. These filters can be used to make your photos more artistic and more interesting.
Rules for composition in drone photography
When shooting with your drone, you need to follow certain composition rules. You should avoid taking shots of the spinning blades if you have a wide-angle lens. Be sure to not place obstructions that could block the signal. A strong signal is important to be able to have control over your drone and also to be visible to other people.
A drone's camera can take photos from up to 400 feet in the air. This will allow you to avoid any collisions with obstacles by taking pictures from such a high altitude. This will save you the hassle of cropping after the fact.
ND filters
ND filters are a great way to get cinematic-quality footage from a drone. They adjust the shutter speed in order to reduce blurring. For best cinematic results, the shutter speed should be set at 1/50 seconds and 25 frames per second.
ND filters serve two functions: to enhance contrast and color definition, as well to blur movement. They are especially useful in photographing scenes with moving objects and people such as fireworks. They also provide the drone owner with information on the exposure of their photos.
Stacking filter
The most important thing in drone photography is stacking filters. The photographer can combine different types to achieve a better picture. For example, an ND can smoothen water on long exposures while a CPL can minimize reflections in midday sunlight. Stacking filters can be flexible as well.
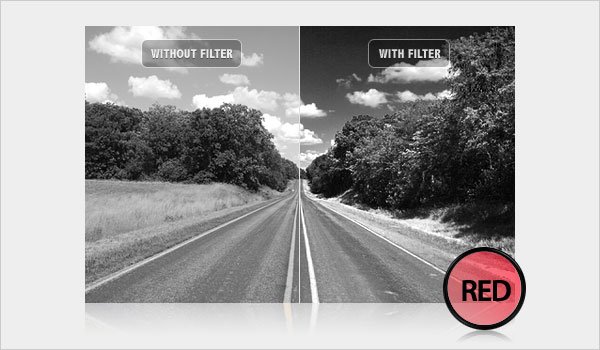
ND filters are most commonly used for drone photography. They reduce light and make the pictures look cinematic. You can also use them to create long exposure shots. These filters reduce the amount light entering the camera lens. They allow videographers a longer shutter speed. Polarizing filters can also be used. These filters darken the sky to make colours pop and enhance their vibrancy. There are many strengths of ND filters, so it's important that you know which one is best for your shooting.
Utilizing a composition grid
It is important to use the correct elements when creating a composition grid for drone photography. For a perfect composition, overlap each frame by 1/3 of the first. A third picture should mimic the second one, and the fourth one should mimic the third. You should also know the drone's Field of View to determine how far apart you need to space your photos.
To use the grid turn on the grid screen on your camera and turn the center crosshair. Next, compose your shot. Once you have created your shot, tap on it to focus the drone. Let it take five frames before adjusting the focus.
Flying a drone
When flying drones for photography, there are some things you should remember. First, know where the camera is facing. This will ensure you get the best possible results. You should point the camera downward or upwards when taking pictures of the subject. This will give the viewer an indication of the subject's scale.
The controls of the drone should be well understood. These controls regulate the power that your drone uses to fly. The drone's throttle controls its power draw from the motors. It also has controls for yaw, which turns the drone counter-clockwise. Additionally, the drone's pitch-and-roll movements allow it to move left and right. You should complete a preflight checklist before flying a drone to avoid any potential hazards. This checklist should take no longer than a few minutes.
FAQ
What is rule of thirds for photography?
The rule to thirds is a great way to create interesting compositions. It divides your image in nine equal parts, vertically and horizontally. It creates three main areas, where your subject should appear. These areas are the top, middle and bottom. These areas can be used to position your subject within your frame.
The rule of thirds also helps you avoid placing important elements too close together or too far apart. If they are too close to each other, it may be difficult for them to make a strong visual impression. If they are placed too far apart, it can cause them to lose focus.
How do I look beautiful in photographs?
It is best to take your own photos to ensure that you look good. You'll learn how to pose for the camera, what angles are flattering, and which ones aren't. Additionally, you'll learn how to use lighting and props in order to enhance your natural beauty.
Learn how to select clothes that fit you well, what make-up looks good on you and what hairstyles best suit your style.
And if you're not happy with the results, we'll show you how to retouch your images using Photoshop and other editing software.
Take some self-portraits.
Which Lenses Do I Need?
The most popular question that beginners ask is "What lens do I need?" Because there are so many options, it can be difficult to choose.
The good news is you don't always need to buy a different lens with every purchase of a camera. You can simply add lenses later.
There are three types possible lenses.
-
Wide Angle Lens (14mm to 24mm): These lenses allow you to see more of your subject from a wider angle. You can zoom in, but not lose image quality.
-
Standard/Normal Zoom Lens (28mm-70mm): These lenses let you change the focal length while still maintaining excellent image quality.
-
Telephoto Zoom Lens (70mm-200mm): These lenses can be used to capture distant subjects. These lenses let you focus on the subject even if they are small.
These lenses can be combined in a variety of ways to create new effects. You can use a normal lens for close-up detail and switch to a zoom lens to capture distant objects.
Statistics
- That's the easiest way to get blurry photos 100% of the time. (photographylife.com)
- There are people out there who will pick at flaws they can only see in 100% crops of your photos. (wikihow.com)
- By March 2014, about 3 million were purchased monthly, about 30 percent of the peak sales total. (en.wikipedia.org)
- In this case, 100% of readers who voted found the article helpful, earning it our reader-approved status. (wikihow.com)
External Links
How To
How to take photographs in low lighting conditions
Low-light photography refers to taking photos in dimly lit or dark environments. It requires special equipment. The main challenges in this field include controlling exposure, whitebalance, and sharpness. There are two types low-light photography: ambient and flash. Flash photography is best when there is enough light. You will need a flash if you don't have enough natural light. Without a flash, it is possible to get a poor picture if the subject is indoors and not outdoors. You can also shoot at night when the moon is shining. You'll be able to capture beautiful colors and shadows this way. Another option is shooting at twilight. Twilight occurs when the sun has set, but there is still daylight left.
Long exposures may be something you want to explore. You can record images even after the shutter is closed for several minutes. The camera records only light falling on the sensor if it is kept closed. During a long exposure, this light continues to fall onto the photo sensor. But, the shutter remains closed and no new light enters. Therefore, there is very little movement. To ensure you're getting a clear image, turn off any automatic settings like autofocus and auto exposure. Make sure to adjust the ISO setting before starting to shoot. A 200 ISO setting gives you greater control over how dark or bright your image looks. Next, click quickly on the shutter button to capture the shot. This will bring the shutter completely to a close. Hold the shutter button down for the final second. To prevent additional light entering the camera, hold the shutter button down. After you've taken the picture, wait a few seconds before releasing the shutter button. This allows the camera time to process the photo. You can view your photos while you wait on the camera. Once you are satisfied, save them on your computer.