These are the essential steps you should follow before you begin your journey to becoming a professional photographer. These include building a portfolio, finding a niche, obtaining licenses, pricing your work, and creating a portfolio. Follow these steps to become an accomplished freelance photographer. Once you complete them, you can start your freelance career. Below are a few key steps.
Finding a niche
In the world of photography, finding a niche can help you make money. Finding a niche requires you to identify who you are trying to reach. This involves identifying the types of clients that you are looking for and what kind of photography you like. You can then focus your photography business to make a living and build a loyal client base. Once you've established your niche, you are able to work towards improving it. Promote your work and look for clients.
Getting a license
Before you start your photography business, you must get a license from the appropriate government agency. There are many types of licenses available for freelance photographers. They will usually start as sole proprietors. But if your plans to expand or hire employees you will need a legal representative. The first step is to obtain an EIN, or Employer Identification Number, which is like a Social Security number for businesses. It is simple to apply online for an EIN. Once you have applied, you will receive your EIN almost instantly. You will need your EIN if you expand your business.
How to build a portfolio
A portfolio is the primary marketing tool of a freelance photographer, and should showcase only your best work. Before you start building a portfolio, it is important to identify your target audience. What kind of images will be most appealing to the clientele you are trying to reach? Are you trying to sell your work to potential employers? Or are you looking to build a portfolio yourself? The most important thing is to choose images that reflect your style and skills.
Pricing your work
Setting rates for your photography services is an important part of your business. It is essential that you accurately reflect all costs associated with producing the final product. This includes overhead, materials, and markup. Although many photographers charge more than their actual cost, it is not necessary to exceed twice that amount in tight markets. You also need to consider sales tax, which you can calculate yourself using a tool such as TaxJar.
Networking
Marketing yourself is essential for freelance photographers. Your ability to network with other professionals will help you build your brand and increase the number of clients. Photographers who make the effort to build a network will have the best client base. Keep in touch with past clients to keep them informed. You can also expand your network through sharing your work via email and social media. Your chances of getting referrals increase the more people who see your work. These are just a few tips to get you started in your network.
FAQ
Which Lenses Do I Need?
Most beginners will ask this question: "Which lens should I buy?" The choice is difficult because of the many options.
You don't have to buy a brand new lens each time you purchase a new camera. Instead, you can buy additional lenses later.
There are three types possible lenses.
-
Wide Angle Lens (14mm to 24mm): These lenses allow you to see more of your subject from a wider angle. You can also zoom in without losing image quality.
-
Standard/Normal Zoom Lens (28mm-70mm): These lenses let you change the focal length while still maintaining excellent image quality.
-
Telephoto Zoom Lens (70mm–200mm) : These lenses are ideal for photographing distant subjects. These lenses allow you stay focused on your subject even when they appear small.
These lenses can be combined in a variety of ways to create new effects. Combining lenses can create different effects. For example, a normal lens could be used to capture small details while a telephoto lens is used to capture faraway objects.
What camera is the best for beginners, and why?
The best camera for beginners depends on your budget, needs, and skill level.
For instance, you could choose a point & shoot digital camera if your goal is to save some money. These cameras aren't as versatile as they look, but they provide good quality.
Digital Single Lens Reflex (DSLR) cameras can be equipped with interchangeable lenses that enable you to shoot different types. These lenses are usually more expensive than point-and shoots, but offer greater flexibility.
For beginners to photography, the beginner's set is a great place for you to start. You'll find everything you need in one package, including a camera body, lens, memory card, tripod, and flash.
Don't forget to buy extra batteries too!
How can I learn how to photograph on my own.
There are many different ways to learn how take great photos. There are several options. You can read a book, go to a class, or join an internet community. You can't go wrong with doing it yourself if you are serious about mastering the art of photographing. This way you can control what goes into each photograph. You will continue to learn and improve, so long as you are willing to keep learning.
The best thing about digital photography? You don't need any expensive equipment. All you need is a computer with internet access and a camera. The rest is up for you.
Here are some tips to get your feet wet:
-
Make sure you are familiar with your camera’s manual settings.
-
Learn the basics of how to use these controls.
-
Make sure to take lots of pictures.
-
These should be edited.
-
Share them.
-
Keep practicing.
-
Experiment.
-
Consider different angles and perspectives.
-
Use light sources creatively.
-
Practice makes perfect.
-
You don't have to be afraid of failing.
-
Be patient.
-
Have fun
Do I Need A Tripod?
This is a question everyone asks. While a tripod may not be necessary all the time, it can prove to be extremely useful.
It can be used to steady your camera while you take slow shutter speeds pictures. A tripod can make all the difference when you're photographing landscapes or other stationary subjects.
However, tripods can blur the images of moving subjects like sports and people. How do you determine which situations need a tripod?
A tripod is an essential tool for photographing fast-moving subjects or stationary objects. Examples include:
-
Sports
-
People
-
Landscapes
-
Close-ups
-
Macro shots
If you're unsure whether you need a tripod, try this test. Look through the viewfinder with your camera steady. A tripod is required if there are blurred lines, movement or other issues.
A tripod won't make any difference if there is no blurring.
However, if you do decide to invest in a tripod, here are some tips to keep in mind.
-
Your tripod should have smooth legs. This helps prevent vibrations that could shake your camera.
-
You should choose a sturdy tripod. Some tripods are made of plastic, so they may not be as durable. Look for a metal tripod instead.
-
You might consider purchasing a remote control. Remote control allows you to remotely control your camera. It can automatically fire the shutter when you press the button.
-
A tripod that can rotate 360 degrees is a good choice. This makes it much easier to position your cameras horizontally or vertically.
-
Tripods are expensive. Expect to pay around $100-200. But, you will get a lot for your buck.
-
Accessories like memory cards and filters should not be forgotten.
-
Before shopping online, be sure to visit your local shop. Many retailers offer free shipping.
-
Read reviews to determine what customers think about a particular product.
-
Ask family and friends who have similar products.
-
Forums and message boards are a great place to find out about customer experiences.
-
User reviews can be found online.
-
Amazon.com allows you to compare prices, and receive customer feedback.
-
Take a look at these photo galleries to see what other photographers do with tripods.
Statistics
- Get 40% off Adobe Creative Cloud(opens in new tab) (creativebloq.com)
- That's the easiest way to get blurry photos 100% of the time. (photographylife.com)
- In this case, 100% of readers who voted found the article helpful, earning it our reader-approved status. (wikihow.com)
- There are people out there who will pick at flaws they can only see in 100% crops of your photos. (wikihow.com)
External Links
How To
How to use Lightroom for Photography
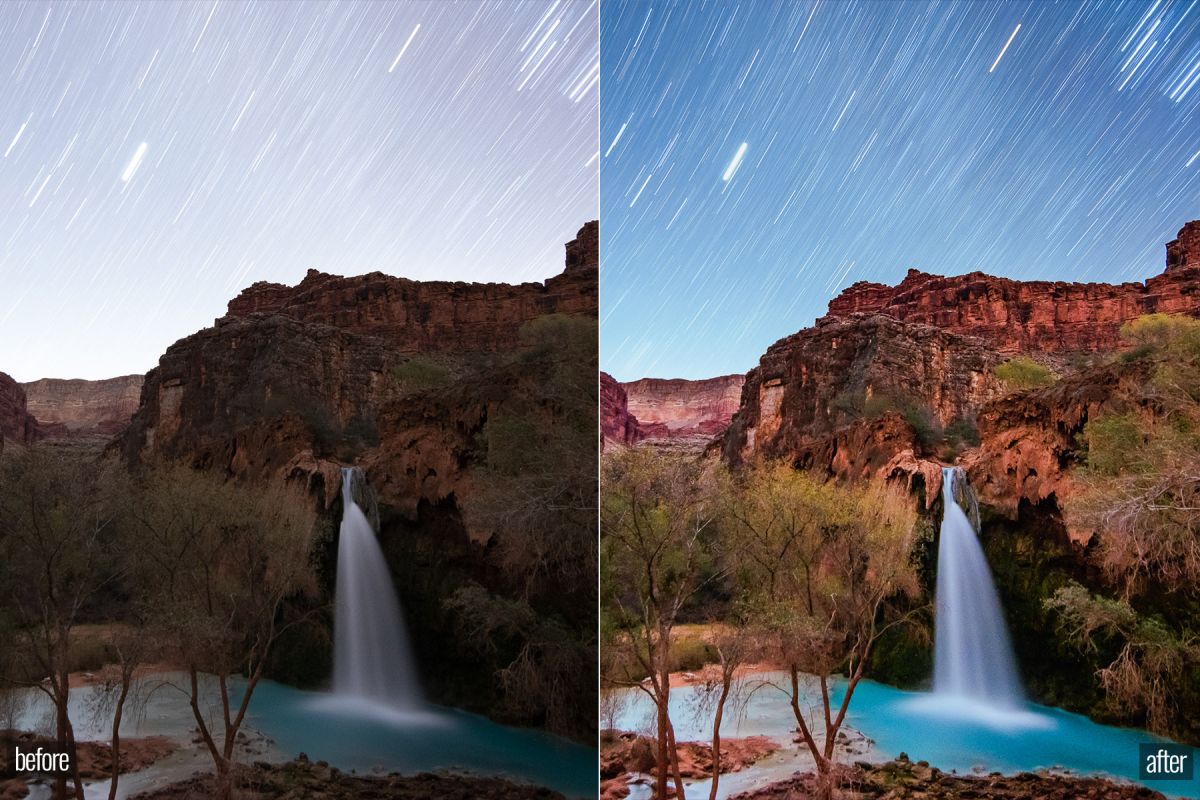
Adobe Lightroom, a powerful tool that allows photographers to edit photos quickly. You can import all your images to one location where they can be viewed and edited. You can also print them or share them online.
Lightroom offers editing tools such as cropping, adjusting brightness and contrast, color balance and color balance. It also includes presets that allow you to apply common effects like vignette and lens distortion correction. The best part is that these changes are applied automatically when you export your image.
Adobe Bridge allows access to Lightroom. This allows you browse your collection and organize your files. You can even add keywords and phrases to your images so that you can find them later.
Lightroom is free if this is your first time using it. This gives you all the basic features. There are two options for upgrading: you can buy the full edition or subscribe.
Lightroom is available in several formats. Adobe offers the option of purchasing the software directly. Another way is to download the trial version and convert it to a paid license. Here's how it works.
-
Lightroom Trial Version
-
Launch the program and click "Convert to License" at the bottom of the window.
-
Select the type of license that you would like (permanent or one-year) and then enter your payment details.
-
To finish the process click "Continue".
-
Once you have converted the trial version to a paid license, you can continue using it until the end of the term.