There are some tips you can use to capture great photos of sports, no matter if you are an avid sports fan or not. You'll also learn how to avoid incoming projectiles and set up your camera for action shots.
Motion blurred
Using motion blur in sports photography can be a great way to capture the action. Photographers must be careful not to create blurry images. Sport photography requires fast shutter speeds to capture the motion. Remember that sports subjects move constantly so motion blur is possible. Sport photography can also benefit from panning.
Panning works best when the subject is moving in a certain direction. To capture more dramatic effects, you can use motion blur. Using a monopod is also a great way to keep your camera steady when panning.
Another way to capture movement in sports photography is long exposures. If you use a long exposure, you can capture different movements and add a dynamic feel to the image.
ND filters can be used to blur the action in sports photography. ND filters lower the amount light so that you can create streaky clouds as well as shallow water effects.
Camera settings
It is possible to make a huge difference with just a few camera settings when shooting sports photography. You can do sports photography indoors or outdoors in many different ways. However, it is up to you to choose the right setting for you.
Sports photography requires a fast shutter speed. You will be able to keep your subject in focus if you use a faster shutter speed. If you are taking a photograph of a fast-moving subject, you may need a shutter speed of 1/500 to 1/1000s.
A wide aperture value can help to draw attention to your subject. However, this can cause the background to become blurred. A monopod can be used to support your camera during panning.
If you are shooting in a darker area, you may need to use a lower ISO. A wider aperture can also result in a shallow depth-of-field. You can also use a larger f/stop for a more artistic look.
Action shots

Action shots are a skill that should be learned and perfected for sports photography. There are many compositional strategies that will allow you to capture great images of sports. There are many variables that can affect the quality of your picture.
It is crucial to learn how you can use the shutter speed in your favor. You will freeze motion better if your shutter speed is faster. If you're photographing a pitcher in a game, for example, you can freeze his arm movements with a fast shutter speed.
You might also want to use a monopod to help steady the camera during panning. This will help you achieve sharp images and blurred backgrounds.
You should also look for the best angles for your action shots. A wide shot is an option if you are photographing a distant game. This can give you a better view of the game and let you enjoy it from a closer distance.
FAQ
How do I look beautiful in photographs?
Photographing yourself is the best way to make sure you look professional in your photos. Learn how to pose and what angles look best. You'll also learn how to use lighting and props to enhance your natural beauty.
You'll discover how to choose clothes that fit well, make-up that looks great on you, and hairstyles that suit your face shape and style.
We'll also show you how to retouch images with Photoshop or other editing software if you aren't satisfied with the results.
You can now take self-portraits.
Should I take up photography as a hobby or a profession?
Photography is a wonderful way for you to capture your memories and share them. It also allows you to learn more about the world around you.
There are many resources online that will help you take better photos if you're interested in this topic.
Consider enrolling at local art schools or community colleges. This gives you the opportunity to meet other photographers, who can offer valuable feedback.
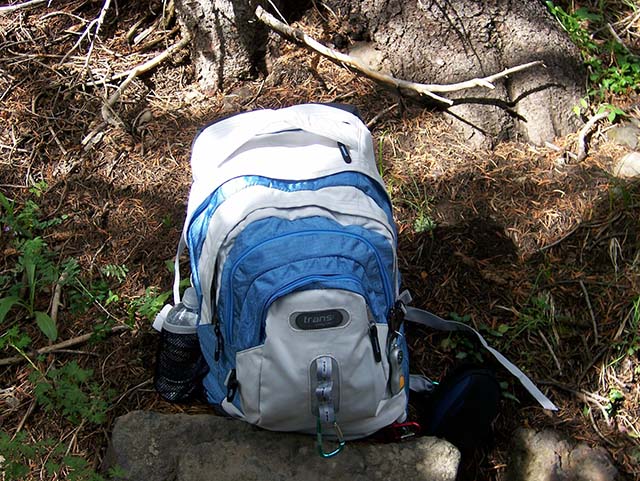
What is a good camera bag?
Because it protects your equipment while you are traveling, choosing a camera backpack is crucial. Here are some things to remember when buying a bag.
-
The bag should be large enough to comfortably hold your accessories and cameras. Don't go bigger than you think you will need.
-
Durability: Look for bags made of durable materials such as leather, canvas, nylon, or polyester. Avoid using plastic bags or fabric bags.
-
Protection: Make your bag waterproof against dirt, moisture and scratches
-
Organization: You can organize your gear by category to make it easier for you to find the right thing. For example, put your lenses in one compartment, your memory cards in another, and your battery charger in yet another.
-
Comfort: Avoid carrying around a bulky bag when you are shooting. Instead, carry a shoulder belt. Also, look for a comfortable design with padded straps.
-
Price: You can shop around to find a great price. Many brands offer their products at discounted prices. This can be a huge advantage.
-
Warranty: Check to see if the company offers a limited warranty. This will allow you to know who to contact if your bag becomes damaged.
Do I Need A Tripod?
This is a question everyone asks. While a tripod isn’t necessary every time, it is useful.
It helps you keep your camera steady while taking pictures at slow shutter speeds. A tripod is a great option for landscapes and other stationary subjects.
However, tripods can blur the images of moving subjects like sports and people. So, how do you know which situations require a tripod?
A tripod is useful in situations where you want to take pictures of fast action and stationary subjects. Examples include:
-
Sports
-
People
-
Landscapes
-
Close-ups
-
Macro shots
You can use this test to determine whether you need a tripod. You can hold your camera still while you look through the lens. You will need a tripod if you see blurred lines and movement.
If you don't see any blurring, you probably won't notice any improvement by adding a tripod.
These are just a few tips to help you decide whether or not to purchase a tripod.
-
You should ensure that your tripod has smooth legs. This will stop unwanted vibrations shaking your camera.
-
A tripod is a good choice. Some tripods may be made from plastic, which can make them less durable. You should opt for a steel tripod.
-
Buy a remote release. You can control your camera remotely with this remote release. It can automatically fire the shutter when you press the button.
-
Look for a tripod that has a 360-degree rotating head. It makes it easy to position your camera horizontally or vertically.
-
Tripods are expensive. Expect to spend around $100-200. But, you will get a lot for your buck.
-
Accessories such as memory cards and filters are important.
-
Before ordering online, you should check in your local shops. Many retailers offer free shipping.
-
You can read customer reviews to see what people think of a product.
-
Ask family members and friends who own similar products.
-
Forums and message boards are a great place to find out about customer experiences.
-
Search online for user reviews.
-
Use websites like Amazon.com to compare prices and read customer feedback.
-
Check out these photo galleries for an example of the work that photographers do with their tripods.
How can I learn how to photograph on my own.
There are many ways you can learn to take great pictures. You have the option to buy a book and attend classes, join an on-line community, or watch YouTube tutorials. But if you want to master the art of taking pictures, there's nothing better than doing it yourself! You have full control over the final product. And you'll continue to improve as long you keep learning.
One of the best aspects about digital photography is that it doesn't require any expensive equipment. All you need to get started is an internet-connected computer and a digital camera. All the rest is up to your imagination.
These are some suggestions to help you get started.
-
Make sure you are familiar with your camera’s manual settings.
-
Learn how to use the controls.
-
Take lots of photos.
-
Modify them.
-
These are yours to share.
-
Keep practicing.
-
Experiment.
-
Explore different perspectives and angles.
-
Use light sources creatively.
-
Practice makes perfect.
-
Don't be afraid to fail.
-
Be patient.
-
Have fun!
How do I get started with digital photography?
You should first consider what kind of camera you want when you begin digital photography. You have several options, including DSLRs (digital single lens reflex cameras), point-and-shoot compact cameras, camcorders, and smartphones. Each model has its own unique features and advantages. For example, DSLR cameras offer high-quality images but are typically larger and heavier than other types of cameras. Point-and shoot cameras are lighter and smaller than other types of cameras and can often be set up automatically for certain situations. Camcorders provide excellent video recording capabilities and may also feature still photo shooting modes. Smartphones are small and lightweight so they can be easily carried.
After you have decided which type of camera you want to purchase, you need to decide if you prefer to buy a new or used model. If the camera was purchased in the past few years, it is possible to find used cameras at reasonable prices. New models generally cost more because manufacturers spend large amounts of money developing new technology.
Next, you will need to purchase lenses. Lenses play a key role in determining the quality of your photographs. They allow you to control the lens's focal length, allowing you to zoom into the scene without losing focus. Some lenses are equipped with flash units built in, while others require external flash units. There are many brands that offer a wide variety of lenses, each with its own unique characteristics.
Finally, you will need to invest in memory cards. Memory cards can store pictures that were taken with your digital camera. Your card's size will determine how many pictures it can store. You will need multiple memory card if you plan on taking many photos.
Statistics
- While I cannot prove that all of those spots were not sensor dust, the photo was taken during a heavy snowstorm…so I guess that 99.8% of the spots are snowflakes. (bhphotovideo.com)
- This article received 13 testimonials, and 100% of readers who voted found it helpful, earning it our reader-approved status. (wikihow.com)
- The second easiest way to get blurry photos 100% of the time is to use a cheap filter on the front of your lens. (photographylife.com)
- There are people out there who will pick at flaws they can only see in 100% crops of your photos. (wikihow.com)
External Links
How To
How to photograph in low light conditions
Low-light photography can be defined as taking photos in dimly lit and dark environments. It requires special equipment. The main challenges include controlling exposure, white balance, and sharpness. There are two types of low light photography: flash and ambient. Flash photography works best when there's enough light around. However, if there's not enough natural light around you, you'll need to use flash. If your subject is outdoors but indoors, you might not have enough light to take a great picture without a flash. Shooting at night in the moonlight hours is a good alternative to using a flash. You'll be able to capture beautiful colors and shadows this way. Another option to consider is shooting during twilight. Twilight occurs when there is still daylight but the sun has set.
Long exposures are also an option. Long exposures let you capture images even after the shutter has been open several minutes. If the shutter is closed, the camera records only the light that falls onto the sensor. The light that falls onto the sensor during a long exposure continues to be recorded. However, because the shutter remained shut, no new light enters the lens. This means that you will not see any movement. You can ensure clear images by turning off automatic settings such as autofocus or autoexposure. Before you begin shooting, adjust your ISO setting. An ISO setting of 200 allows you to adjust how bright or dark the image looks. Once you are ready to click the shutter button, make sure it is fast. This will cause the shutter to close completely. Keep the shutter button pressed down until the last second. By holding down the shutter button, you prevent additional light from entering the camera. Once you have taken your picture, wait for a few moments before you release that shutter button. This allows the camera to process the image. While you wait, your photos will be displayed on your computer's screen. Once you are satisfied, save them on your computer.